Deploy to EdgeOne with GitHub Actions

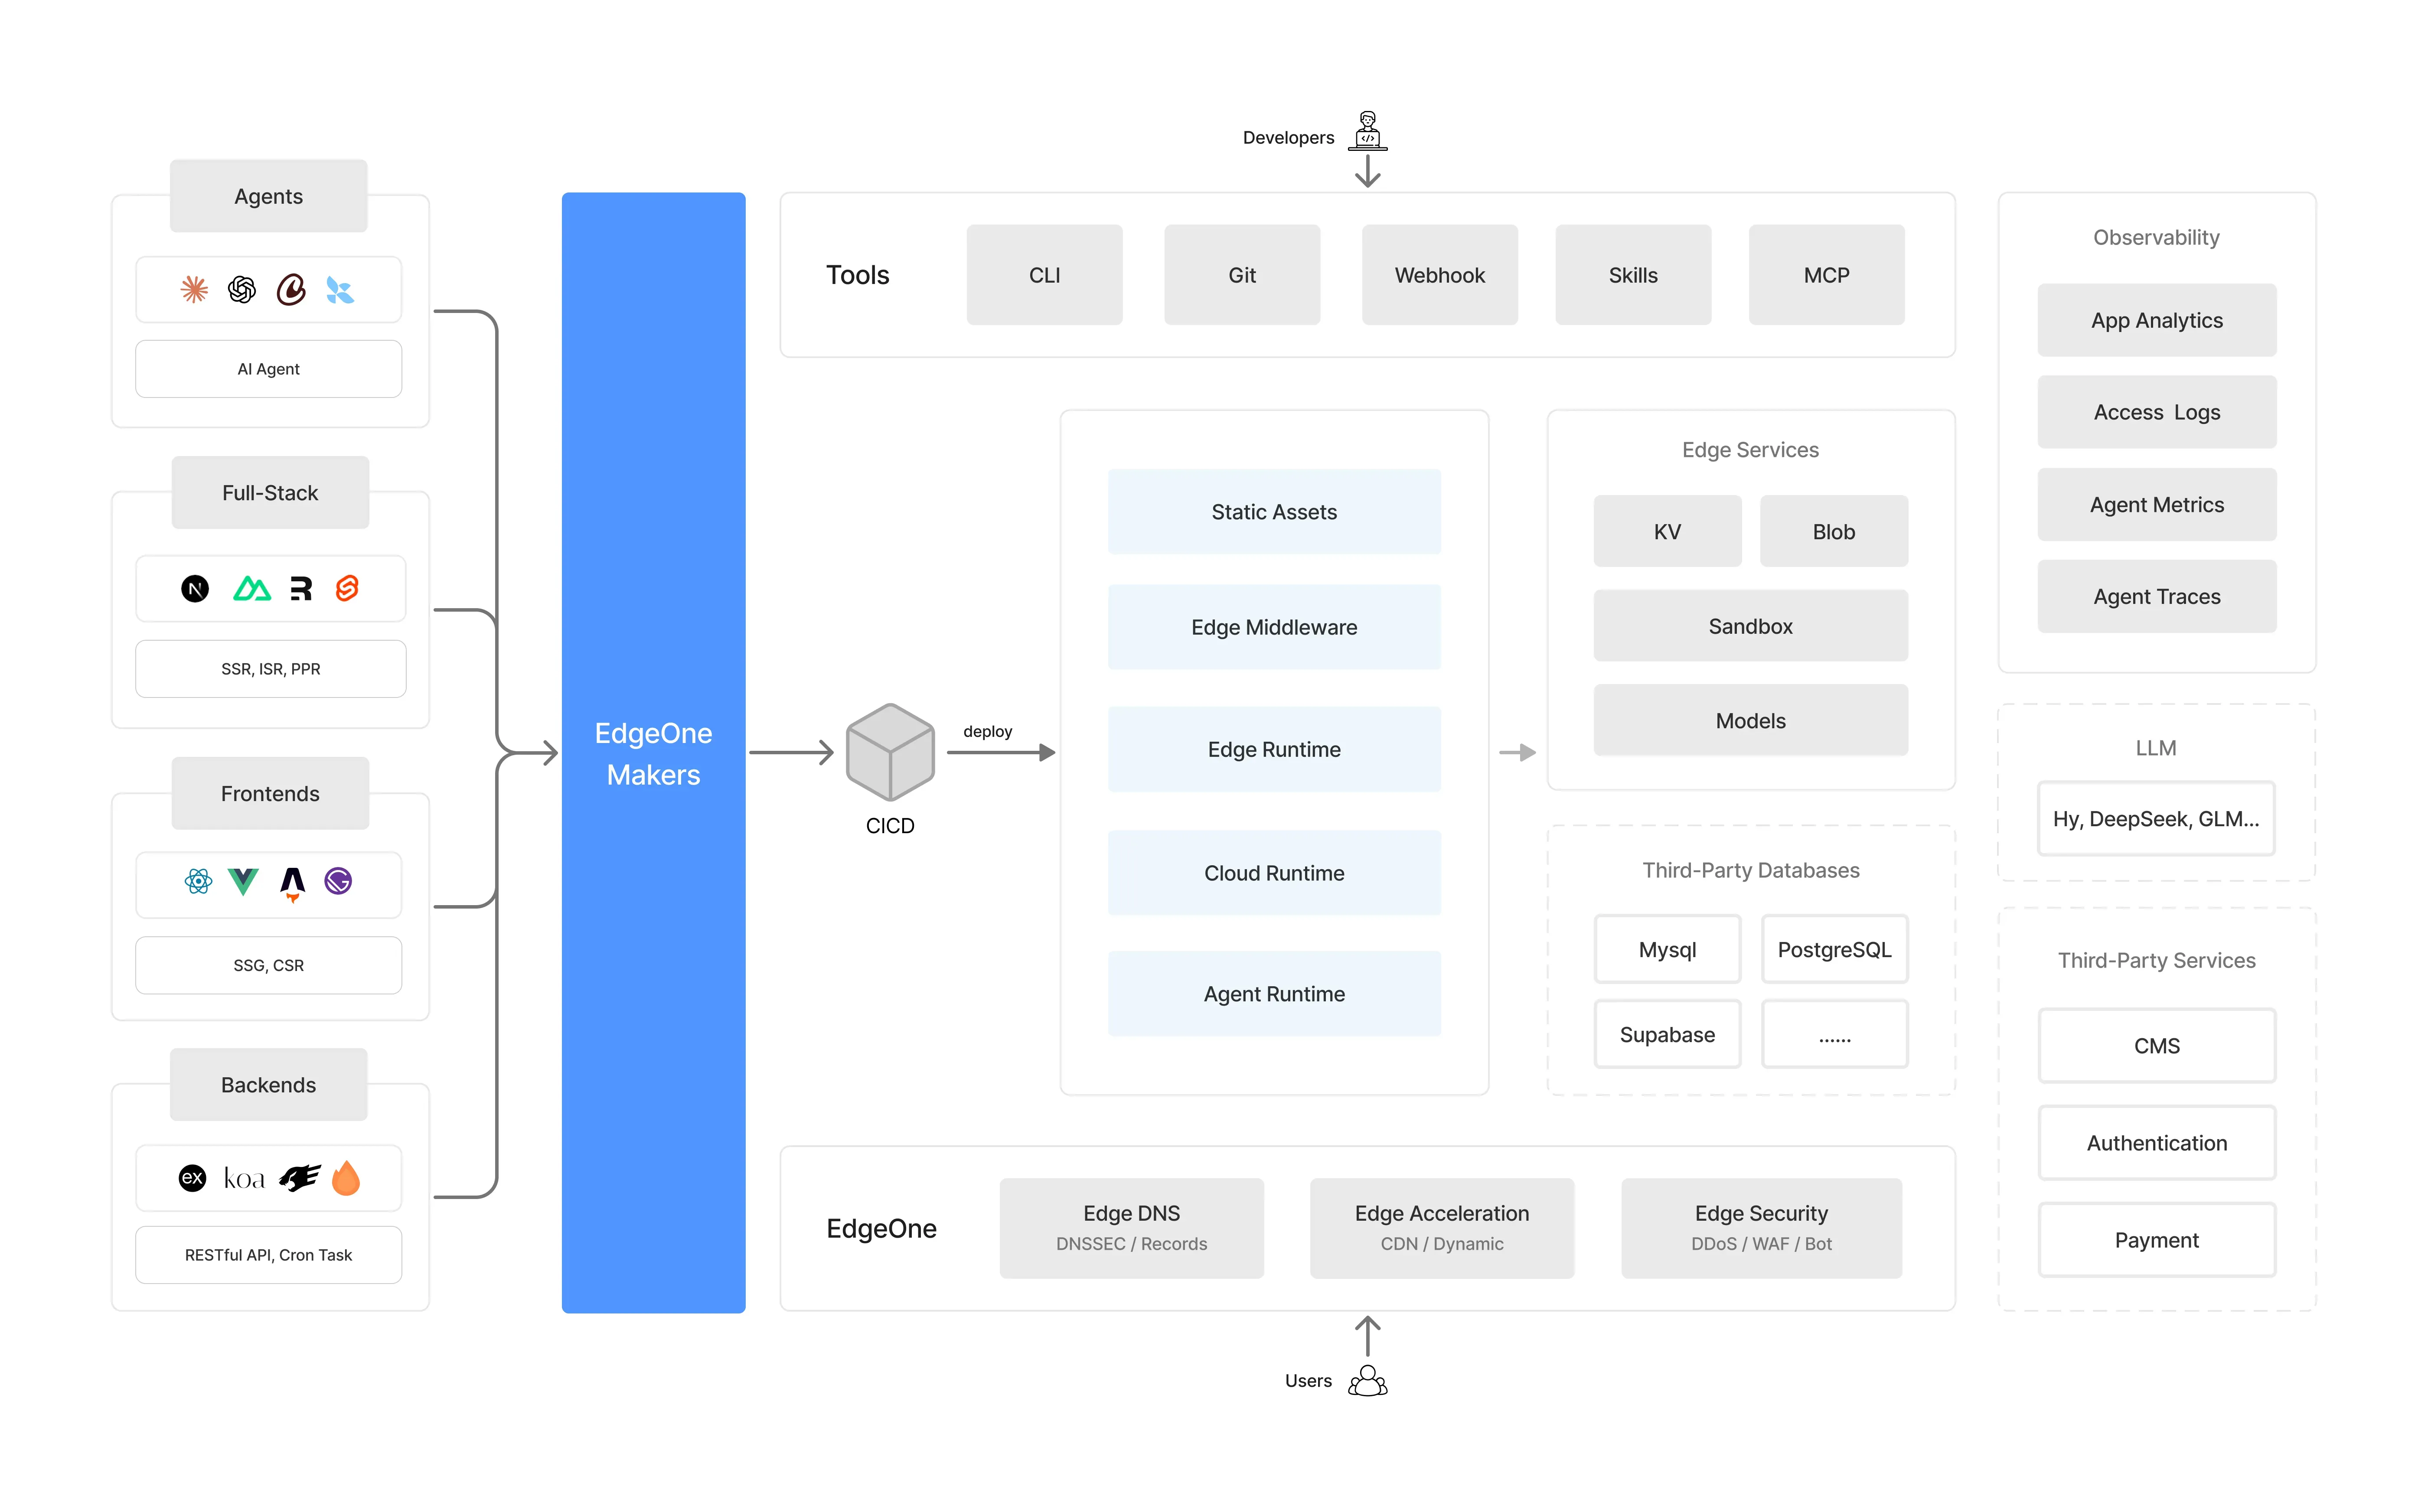
1. What Is EdgeOne Makers
EdgeOne Makers is the full-stack development and deployment platform from Tencent Cloud EdgeOne, formerly known as EdgeOne Pages. It leverages Tencent Cloud’s global network of 3,200+ edge nodes to provide static website hosting, edge function computing, object storage, and more — all in one integrated platform.
Compared to traditional cloud server deployment, EdgeOne Makers offers:
- Zero configuration: No server management required — push code and it’s deployed
- Global acceleration: EdgeOne’s edge network ensures low-latency access worldwide
- Built-in security: DDoS protection, Web Application Firewall, and other security features out of the box
- Full-stack capability: Supports static sites + edge functions (Edge Functions) hybrid architecture
2. Why GitHub Actions
GitHub Actions is GitHub’s native CI/CD tool that automatically runs build, test, and deployment tasks on events such as code pushes or pull requests. Combined with EdgeOne Makers, it enables a complete “code push → auto-build → auto-deploy” pipeline.
Advantages:
- Zero additional cost: GitHub Actions’ free tier is sufficient for personal projects
- Deep integration with your repository: code changes trigger deployment automatically
- Rich action ecosystem: Checkout, Setup Node, pnpm — ready-to-use actions are available
- Environment variables & Secrets: securely manage sensitive information like API tokens
Limitations of EdgeOne Makers built-in build environment
EdgeOne Makers itself supports building and deploying directly on the platform, which looks like “zero configuration.” However, its built-in build environment has two unavoidable shortcomings. This article therefore adopts the approach “GitHub Actions builds + EdgeOne Makers hosts”, handing the entire build process to GitHub Actions:
-
Node versions are limited to a few pre-set options; you cannot freely specify a version
According to EdgeOne’s official Build Guide, the Makers build environment only pre-installs the following Node versions:
14.21.3, 16.20.2, 18.20.4, 20.18.0, 22.11.0, 22.17.1, 24.5.0You can only pick one from the “Project Settings → Node.js Version” dropdown. While you can specify a different version via
.nvmrcin the project root, the platform will re-download that version and will not include pnpm / yarn / bun — which is not ideal for pnpm-based projects. Theedgeone.jsondocumentation explicitly warns: “Filling in other version numbers may cause deployment failure.” (For official documentation on version limits and build environment constraints, see Reference at the end.)GitHub Actions, via
actions/setup-node, can freely specify any Node version (such as26in this article) without being restricted to a platform whitelist. -
The default build environment is weaker than GitHub Actions and not customizable
Makers’ build jobs run in a shared sandbox on the platform. Its CPU, memory, and other specifications are not publicly documented, and you cannot choose a higher-spec runner like you can with GitHub Actions. For projects with heavy dependency installation or long build times (e.g., an Astro site with extensive image optimization), the default platform build environment is more likely to face resource constraints and slower builds.
The following table compares the build capabilities of both:
| Item | EdgeOne Makers Default Build Environment | GitHub Actions Runner |
|---|---|---|
| Node Version | Only fixed pre-set versions, no free selection | Any version, freely specified via setup-node |
| Build Machine Specs | Platform-fixed shared sandbox, specs undisclosed and not adjustable | Standard runner approx 2 vCPU / 7 GB RAM / 14 GB SSD; larger runners available |
| Package Manager / Toolchain | Limited by pre-installed environment (.nvmrc custom versions lack package managers) | Freely install any toolchain (pnpm, yarn, bun, etc.) |
| Build Cache | Platform-managed, limited flexibility | Can cache pnpm/npm store and build artifacts for significant speedup |
| Private Dependencies / Secrets Injection | Depends on platform environment variable configuration | Flexible via Secrets, caching, service containers |
None of the Node versions pre-installed by EdgeOne Makers meet Astro’s requirements, so building must be done in GitHub Actions, and only the upload step is handled by the EdgeOne CLI.
3. Prerequisites
Before getting started, complete the following preparations.
3.1 Sign Up for EdgeOne Makers
-
Visit the EdgeOne Makers Console
-
Register or log in with your Tencent Cloud account
-
Create a new project (Project), and note down the project name and project ID
-
Project Name: you enter this when creating the project; corresponds to
EDGEONE_NAMEin the workflow. -
Project ID: not directly displayed on the console page — you need to get it from the browser’s address bar URL. After entering the project, the URL will look like
https://console.edgeone.ai/makers/pages/<ProjectID>/...; the identifier in the path is the project ID, which corresponds toEDGEONE_PROJECT_IDin the workflow.
Note: A new empty project must have at least one file uploaded before it can be created. Since we’ll use GitHub Actions to deploy real build artifacts later, just upload a minimal
index.htmlas a placeholder, for example:<!doctype html> <html> <head> <meta charset="utf-8" /> <title>placeholder</title> </head> <body> <h1>Deploying...</h1> </body> </html>After the workflow runs for the first time, this placeholder will be overwritten.
-
3.2 Get an API Token
In the EdgeOne Makers console, go to Settings → API Token and create a new token. The token is the credential for deployment and must be kept secure.
3.3 Prepare Your Project
This article uses an Astro static blog as an example. The project should include the following key files:
edgeone.json (in the project root) — defines build commands, install commands, and response header configuration. The complete configuration and field details are covered in Section 7 below.
4. Configure GitHub Secrets
Configure Secrets in your GitHub repository to store sensitive information needed for deployment.
- Go to your GitHub repository
- Click Settings → Secrets and variables → Actions
- Click New repository secret and add the following three Secrets one by one:
| Secret Name | Description | Where to Get It |
|---|---|---|
EDGEONE_NAME | EdgeOne project name | EdgeOne console project settings page |
EDGEONE_PROJECT_ID | EdgeOne project ID | EdgeOne console project settings page |
EDGEONE_API_TOKEN | API access token | EdgeOne console API Token page |
Once configured, these Secrets can be referenced in the workflow using ${{ secrets.SECRET_NAME }}.
If you’re new to Secrets, refer to GitHub’s official documentation: Using secrets in GitHub Actions.
5. Create the GitHub Actions Workflow
Create .github/workflows/deploy-edgeone.yml in your project root. Below is a step-by-step breakdown of the complete workflow configuration.
5.1 Trigger Conditions
name: Deploy to EdgeOne Makers

on:
  push:
    branches:
      - main
workflow_dispatch:pushevent: automatically triggers deployment when code is pushed to themainbranchworkflow_dispatch: allows manual triggering from the GitHub Actions tab
5.2 Checkout Code
jobs:
  deploy:
    runs-on: ubuntu-latest
    steps:
      - name: Checkout
        uses: actions/checkout@v7
runs-on: ubuntu-latest specifies that the entire deploy job runs on GitHub’s latest Ubuntu runner (standard runner approx 2 vCPU / 7 GB RAM / 14 GB SSD). All subsequent steps execute sequentially in that environment — providing predictable specs compared to EdgeOne Makers’ undisclosed shared sandbox. actions/checkout@v7 checks out your repository code into that environment, equivalent to running git clone locally.
5.3 Install the Package Manager
- name: Install pnpm
  uses: pnpm/action-setup@v6
This project uses pnpm as its package manager, so pnpm needs to be installed first. The install method varies by package manager: use pnpm/action-setup@v6 for pnpm, or no extra install for yarn / npm (bundled with the actions/setup-node step in the next section). As for bun — since it is a Node.js-compatible runtime and package manager, it is covered together with Node.js in the “Install the Runtime” section below. To avoid step conflicts, enable only one at a time and comment out the rest. pnpm/action-setup@v6 automatically detects the packageManager field in package.json and installs the corresponding version.
5.4 Install the Runtime (Node.js / bun)
This project needs a JavaScript runtime — choose either Node.js or bun. bun is a Node.js-compatible runtime and package manager: it can run JS / TS code directly, works with package.json and the npm ecosystem, and can replace “Node.js + npm/pnpm” entirely.
# ① Node.js (used by pnpm / yarn / npm)
- name: Setup Node.js
  uses: actions/setup-node@v7
  with:
    # set the Node.js version according to your project's needs
    node-version: 26
    # cache only supports npm / yarn / pnpm
    cache: pnpm

# ② bun (https://github.com/oven-sh/setup-bun)
# - name: Setup bun
#   uses: oven-sh/setup-bun@v2
#   with:
#     cache: true
When using Node.js
- Install the specified Node.js version via
actions/setup-node(26in this example — adjust to your project’s needs) - Enable
cache: pnpmto cache thepnpm storeand speed up builds; note thatcacheonly supportsnpm/yarn/pnpm
When using bun
- bun is compatible with the Node.js ecosystem and can run JS / TS projects directly, so you can usually omit the “Setup Node.js” step above
- Use
cache: trueinoven-sh/setup-buninstead for dependency caching - The
npxcommand in the deploy step must also be changed tobunx(see section 5.6)
5.5 Create the Project Link File
- name: Create EdgeOne Project Link File
  run: |
    mkdir -p .edgeone
    echo '{"Name":"${{ secrets.EDGEONE_NAME }}","ProjectId":"${{ secrets.EDGEONE_PROJECT_ID }}"}' > .edgeone/project.json
This JSON file tells the EdgeOne CLI which project to link before deploying, and it is the key to the entire workflow. Two things to note:
-
Not linking a project ID triggers “auto-create project”, which fails due to name conflicts
When the CLI runs
makers deploy, it needs to know which project to upload the build artifacts to. This association is stored in.edgeone/project.json(containing the projectNameandProjectId). If this file doesn’t exist locally or theProjectIdis invalid, the CLI will attempt to create a new project using theName. However, since a project with that name already exists in the EdgeOne console, creating a new one will fail due to a project name conflict. Therefore, you must explicitly write the correctProjectIdin CI so that the CLI points directly to the existing project instead of trying to create a new one. -
The
edgeone makers linkcommand cannot be used in CI environmentsEdgeOne CLI does provide the
edgeone makers linkcommand for linking a project, but this command requires interactively selecting the target project in a terminal, which cannot be automated in a non-interactive GitHub Actions Runner. That’s why we use the “directly write.edgeone/project.json” approach to establish the project link non-interactively in the pipeline.
Summary: The
NameandProjectIdwritten in this step come from the GitHub Secrets configured earlier — both are essential:Nameidentifies the project,ProjectIdprecisely targets the existing project to avoid name conflicts.
5.6 Execute Deployment
- name: Deploy to EdgeOne
  run: |
    npx edgeone makers deploy -t ${{ secrets.EDGEONE_API_TOKEN }} -e production
The final step uses the EdgeOne CLI’s makers deploy command to perform the deployment:
npx edgeone: runs the@edgeone/clipackage via npxmakers deploy: the EdgeOne Makers deployment command-t: passes the API Token for authentication-e production: specifies deployment to the production environment
If using bun: replace npx with bunx, i.e.:
run: |
  bunx edgeone makers deploy -t ${{ secrets.EDGEONE_API_TOKEN }} -e production
bunx is bun’s built-in executable-package runner, equivalent to npx, and can be used in its place here.
The CLI automatically reads the edgeone.json configuration from the project root, executes installCommand (install dependencies) and buildCommand (build the project), then uploads the build artifacts to the EdgeOne edge network.
6. Complete Workflow File
Combining all the steps above, the complete .github/workflows/deploy-edgeone.yml file is as follows:
name: Deploy to EdgeOne Makers

on:
  push:
    branches:
      - main
  workflow_dispatch:

jobs:
  deploy:
    runs-on: ubuntu-latest

    steps:
      # 1. Checkout code
      - name: Checkout
        uses: actions/checkout@v7

      # 2. Install package manager (choose as needed; comment out unused ones to avoid conflicts)
      # ① pnpm (default)
      - name: Install pnpm
        uses: pnpm/action-setup@v6
      # ② yarn / npm (no extra install needed, bundled with the Setup Node.js step below)
      # no install step

      # 3. Install runtime (Node.js / bun)
      # ① Node.js (used by pnpm / yarn / npm)
      - name: Setup Node.js
        uses: actions/setup-node@v7
        with:
          # set the Node.js version according to your project's needs
          node-version: 26
          # cache only supports npm / yarn / pnpm
          cache: pnpm
      # ② bun (https://github.com/oven-sh/setup-bun)
      # - name: Setup bun
      #   uses: oven-sh/setup-bun@v2
      #   with:
      #     cache: true

      # 4. Create EdgeOne project link file
      - name: Create EdgeOne Project Link File
        run: |
          mkdir -p .edgeone
          echo '{"Name":"${{ secrets.EDGEONE_NAME }}","ProjectId":"${{ secrets.EDGEONE_PROJECT_ID }}"}' > .edgeone/project.json

      # 5. Deploy to EdgeOne (if using bun, replace npx below with bunx)
      - name: Deploy to EdgeOne
        run: |
          npx edgeone makers deploy -t ${{ secrets.EDGEONE_API_TOKEN }} -e production
7. edgeone.json Configuration
edgeone.json in the project root is the core configuration file for EdgeOne Makers, declaring build commands and deployment behavior. The complete configuration for this project is shown below (note that the headers field is required — omitting it will cause the platform to fall back to default response headers):
{
  "installCommand": "pnpm install --frozen-lockfile",
  "buildCommand": "pnpm build",
  "headers": [
    {
      "source": "/*",
      "headers": [
        { "key": "cache-control", "value": "public,max-age=300,immutable" },
        { "key": "x-content-type-options", "value": "nosniff" }
      ]
    },
    {
      "source": "/_astro/*",
      "headers": [
        {
          "key": "cache-control",
          "value": "public,max-age=31536000,immutable"
        },
        { "key": "x-content-type-options", "value": "nosniff" },
        { "key": "access-control-allow-origin", "value": "*" }
      ]
    },
    {
      "source": "/*.js",
      "headers": [
        {
          "key": "content-type",
          "value": "application/javascript;charset=utf-8"
        }
      ]
    },
    {
      "source": "/*.css",
      "headers": [{ "key": "content-type", "value": "text/css;charset=utf-8" }]
    }
  ]
}
Configuration highlights:
installCommand: dependency install command;--frozen-lockfileensures the lock file is not modified for consistent buildsbuildCommand: build command (i.e.,astro check && astro build)headers: response headers by URL path, divided into four categories in this project:/*: cache globally for 5 minutes (300 seconds) + disable MIME sniffing (nosniff)/_astro/*: build artifacts with content hashes, cache for 1 year (31536000 seconds) + allow cross-origin access/*.js,/*.css: explicitly declare MIME types to ensure correct browser parsing
For complete field documentation and advanced usage, refer to the official docs: EdgeOne Makers edgeone.json configuration.
8. Deployment Verification & Monitoring
8.1 Check Deployment Status
After pushing the workflow file to the main branch:
- Go to the Actions tab in your GitHub repository
- You’ll see the Deploy to EdgeOne Makers workflow running
- Click on it to view detailed logs
8.2 Access Your Site
Once deployed, EdgeOne Makers will automatically assign a preview domain. You can also bind your own custom domain.
8.3 Custom Domain & HTTPS
In the EdgeOne Makers console under Domain Management:
- Add your own domain
- Add a CNAME record at your DNS provider as instructed
- Wait for the SSL certificate to be issued automatically (EdgeOne manages HTTPS certificates automatically)
9. Troubleshooting & Best Practices
9.1 Build Failure
- Check that
installCommandandbuildCommandinedgeone.jsonare correct - Make sure
package.jsonexists and dependencies install properly - Check the specific error message in the Actions log
9.2 Secrets Leak Risk
- Never hardcode tokens in your code
- Rotate API tokens regularly
- Use different tokens for different projects
9.3 Preview Deployment
# Deploy to preview environment on PR
on:
  pull_request:
    branches:
      - main
Then change -e production to -e preview in the deploy step to create a preview site for each PR automatically.
9.4 Speed Up Builds
- Enable
cache: pnpmto cache dependencies - Move large, unchanging dependencies (e.g.,
sharp) todependenciesinstead ofdevDependencies - Use
--frozen-lockfileto avoid version resolution during install
10. Summary
Combining GitHub Actions with EdgeOne Makers gives us:
- Push-to-deploy — no manual steps required
- Global acceleration via the edge network
- Well-configured caching strategies for better user experience
- Secure API token management with credential safety
This automated deployment approach is not limited to Astro projects. It works equally well with Vue, React, Hexo, Hugo, or any frontend framework that generates static assets. Use the configuration in this article as a reference to quickly set up your own automated deployment pipeline.
Reference Documents
Links to all documents and resources mentioned in this article:
- EdgeOne Makers Console: https://console.edgeone.ai/makers
- GitHub Actions: Using secrets in GitHub Actions
- EdgeOne Makers Build Guide (Node version): https://pages.edgeone.ai/document/build-guide
- EdgeOne Makers edgeone.json configuration: https://pages.edgeone.ai/document/edgeone-json
- GitHub Actions used in this article:
actions/checkout: https://github.com/actions/checkoutactions/setup-node: https://github.com/actions/setup-nodepnpm/action-setup: https://github.com/pnpm/action-setupoven-sh/setup-bun: https://github.com/oven-sh/setup-bun